WPF-Revit -01

In this post, we are going to surface explore WPF structure and how to use it within Revit App.

Windows Platform Foundation WPF

Windows Presentation Foundation (WPF) is a UI framework that creates desktop client applications. The WPF development platform supports a broad set of application development features, including an application model, resources, controls, graphics, layout, data binding, documents, and security. The framework is part of .NET, so if you have previously built applications with .NET using ASP.NET or Windows Forms, the programming experience should be familiar. WPF uses the Extensible Application Markup Language (XAML) to provide a declarative model for application programming.
~Microsoft So you can say WPF is another way of showing graphical interface to users from what we used to know as Windows Forms. The main reason behind creating this development is to adapt the scale of the Graphical Contents (Button, Images, Bars,...etc) to the various Monitor dpi. Nevertheless, 
~Ref
  1. WPF has the ability to separate UI from logic effectively.
  2. WPF has an inbuilt storyboarding feature and animation models.
  3. Data binding is very much better than with the WinForms application.
  4. WPF allows you to handle large data sets because it has a built-in 'user interface virtualization feature.
  5. WPF offers data and control templates that provide flexible modeling of UI on data models.
  6. WPF supports 3D graphics to make UIs look really special.
  7. WPF supports various types of media such as video, 3D content, and animations.
  8. Even if Visual Studio designer is not available, you can code in XAML (Extensible Application Markup Language). 

WPF Structure

WPF is relaying on separating all the processes from the user interface. Something like the download progress... if you are downloading a large file from the internet, your application interface needs to be responsive to the user, then blocked, while waiting for the download to be finished. the key thing to make this workable is MVVM Pattern.
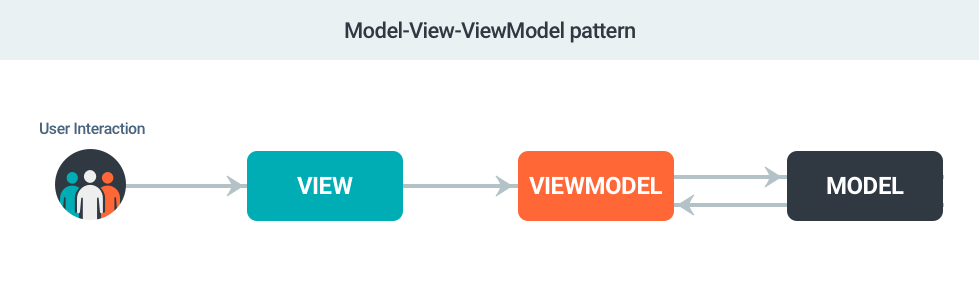
MVVM Pattern

MVVM is an abbreviation for Model - View - ViewModel. 

Model:

is a representation for the actual data/Information. any changes to a property of this Model, will be reflected the View Layer, only if this property has a Notification.

View:

this is related to what the user will see and interact with, such as buttons, window, textbox....etc.
WPF user interface is divided to parts XAML, and Code Behind.
XAML stands for Extensible Application Markup Language. It’s a simple and declarative language based on XML. In XAML, it very easy to create, initialize, and set properties of objects with hierarchical relations. It is mainly used for designing GUIs, however it can be used for other purposes as well, e.g., to declare workflow in Workflow Foundation. ~tutorialPoint
 it worth mentioning, it is not a must to learn XAML to Create a WPF Application. you can use Code behind to create the content of a WPF interface.
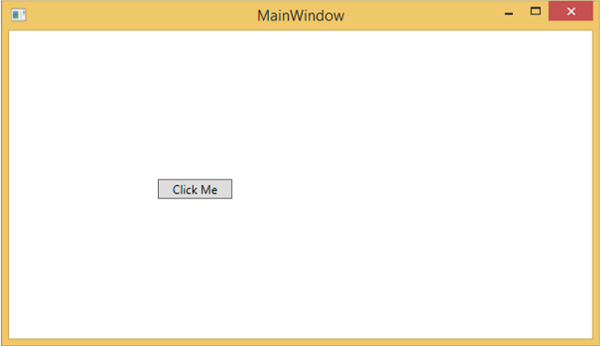
see this example that exactly do the same result:
```<Window x:Class = "WPF_Revit.MainWindow"     xmlns = "http://schemas.microsoft.com/winfx/2006/xaml/presentation"     xmlns:x = "http://schemas.microsoft.com/winfx/2006/xaml"    Title = "MainWindow" Height = "600" Width = "800">     <StackPanel>        <Button x:Name = "button" Content = "Click Me" HorizontalAlignment = "Left"  Margin = "150" VerticalAlignment = "Top" Width = "75" />     </StackPanel>  </Window> ```
and Code Behind C# language will look like this
```using System.Windows; using System.Windows.Controls; namespace WPF_Revit {     /// <summary>        /// Interaction logic for MainWindow.xaml     /// </summary>     public partial class MainWindow : Window     {        public MainWindow()        {           InitializeComponent();           // Create the StackPanel           StackPanel stackPanel = new StackPanel();          this.Content = stackPanel;           // Create the Button           Button button = new Button();          button.Content = "Click Me";           button.HorizontalAlignment = HorizontalAlignment.Left;           button.Margin = new Thickness(150);           button.VerticalAlignment = VerticalAlignment.Top;           button.Width = 75;   stackPanel.Children.Add(button);         }     }  }```
XAML Output

In fact, XAML will speed writing, for example, Creating a button in XAML is one line of code against 7 lines in C#. but all in all, it is all up to the developer to chose what fits best to his development.

ViewModel:

this is the medium between the user interface (View) and the (Model). and usually used as the DataContext for the view. ViewModel is where all the logic and operations are executed, reflecting the results to the Model and the Model triggers a Notification Change to the ViewModel, so to push the updates to the View. see the below sketch to clarify more.
in the next post, we will explain how to use the above in Revit. see you then.

Database

Credit: CC0 Public Domain
Memory is the ability to take in information, store it, and recall it at a later time. In psychology, memory is broken into three stages: encoding, storage, and retrieval. Stages of memory: The three stages of memory: encoding, storage, and retrieval. Problems can occur at any stage of the process. ~lumen
This has explained the human memory process. Since human tends to forget, and can't live forever, a new approach is created to enhance storing information using Database technology.

Introduction:

The database is a patterned structure of information stored in fields under Tables, which allows data stored in a specific organized manner. Through this pattern, you can easily get any information as long as it is stored.

Contents:

The database uses tables for storing data. We can create tables as many as we need, but generally, tables are designed in a pattern that suits the information that is to be stored. Nevertheless, Tables are also designed to call each other through a calling reference. For example, I am staying in Dubai, and my friend stays as well in Dubai. so we create a table to hold countries' names and then reference people's tables to the country of residency. Didn't get it yet? hang on a more detailed example is explained below.

This is how Wikipedia defined Database:
database is an organized collection of data, generally stored and accessed electronically from a computer system. ~Wiki

Example on Queries

Let's have a practical example of how we can use a Database to call for data.
I will be using SQLite studio you can download from here
and I will use this pre-structured Database for the purpose of this post. Download from here.

First look when you open a database file
After you download SQLite Studio Press Ctrl + O to open a database File. Select the "Sample. DB" file, you downloaded and you will get to this window

You can see, there are two Tables "Level" and "Room". This database is extracted from Revit and simplified for the purpose of this post.

Double click on Level Table, and then select Data Tab from the browsing area.

Any table is a collection of fields (Pattern) where you can fill in Data. Fields have extra properties, such as Primary Key, Uniq, Not Null...etc, which we will not discuss in this overview tutorial.

You will see the structure of "Level" is as follow:
Elevation,
ElementId,
Name,
Code,
GUID

These fields are the pattern used to shape the Level Table. Meaning every Row in this table will contain information that is bound to each field (Column Name)
see this snapshot of how data looks like after being filled in the Level table


Now, let's open the Room Table. You can see there is no much difference in the concept. The room's table is also another table that holds fields that shape the pattern of the Room Table.

If you look closely, you will find there is a field called "FKey_Level". Can you guess what is this field used for?. Well, since a room is a part of a level, tables need to know that. Tables need to have a calling reference to another data in another table. Let's rephrase this, but first, you need to know that the Database doesn't care about the data value you fill in a table, but it cares about the structure of the table. With that said, each table must have a Unique Field. This Unique Field is used to uniquely define each row. Let's illustrate this in this example.

Look to the first row in the Room Table, and copy the FKey_Level value, you would get this "c6422095-3e7a-45ff-bbc8-15e2c2942d27" This is a calling reference to information stored in Level Table. Now open Level Table and look in the GUID field for this number... It will take too long to find this information, isn't it? or even if not, it would be a bit silly, to search for something while the computer and Database are meant to do this for you. so let's start writing our first Query.

But wait for a second, Why I should be looking in the GUID field in the Level table for this value? this is because these 2 tables are designed to talk to each other through these Unique Fields. (GUID in Level Table Vs FKey_Level in Room Table) you can read more about FOREIGN KEY

From Menu Bar Select Tools--> Open Editor, or Click Alt + E
Opening SQL Editor


Now We need to ask the Database the following:
I need all the fields from Table Level, but only where Field GuId has this value  "c6422095-3e7a-45ff-bbc8-15e2c2942d27"


Translating that to SQL language would be like this
```Select * from Level where GuId = 'c6422095-3e7a-45ff-bbc8-15e2c2942d27'
```
Writing my First Query
Then press the F9 key to run this query

So basically * (asterisks) here means all the fields in a row. SQL by then will search in each row for the value "c6422095-3e7a-45ff-bbc8-15e2c2942d27" under the column GuId, and the result will show at the bottom window.


Of course, you can make this more advanced for example I need to select only Fields "Name" and "Elevation"


```Select [Name],[Elevation] from Level where GuId= 'c6422095-3e7a-45ff-bbc8-15e2c2942d27'
```
You can also show the table in Descending order of elevation

```Select * from Level Order by Elevation Desc
```
Descended order of Level
There is a very big list of queries where you can use to alter and manipulate your Database. Code Academy made a good referral list for this.

All in all, a Database is the core of any Computer Application. It helps Storing, Recalling information on the hard drive instead of computer Memory, which greatly improves the speed of the application, without affecting the performance of the CPU.

That's all for now, see you in the next post.


Excel Chart


A Picture Is Worth a Thousand Words. In Excel you can use Charts to deliver a better message of numbers. Let’s say we have the following scenario
A contractor during a construction project is submitting Material samples to the Project Manager (PM) for Approval. The PM asked a log for all submitted and how many materials are approved/pending

See this table

Discipline
Total
Under Review.
Appr.A & B
Resub. Required B.
Resub. Required C.
Not Sub.
1
Structure
30
0
29
1
0
0

Architecture
125
0
99
24
2
0
2
 ID
256
1
195
58
2
0
3
Landscape + Kitchen+SPA Work-Swimming Pool+Lift works
131
0
127
4
0
0
4
MEP Elect
87
0
80
6
1
0
5
MEP Mech
96
0
88
8
0
0

Total
725
1
618
101
5


Such a table with more or less intensive data is not much helpful for evaluation. Human loves colors and graphics. So how about this

Now such presentation will improve evaluating the status of Material submittals, where you can easily see there is a a lot of submissions in the ID approved compared to other disciplines.

How to do it:

you can write your own table in Excel or you can copy and paste the above table.
Then select the data you need for the chart including the headers.
in our case selected those cells that inside the Red Rectangle


now right click and select Quick Analysis, and follow the steps shown in the below images.


one more last thing, is to change the style of the chart.
Select the chart that is recently created and follow the below steps

hope this makes things easy for every body.
happy to share this excel file for educational purpose :)
Excel Example

My 1st Excel Formula

There is no doubt that any computer user, must have passed by Microsoft Excel. MsExel, is a very smart application that helps creating schedules, Tables with all its kinds. and draw Charts. In fact, I have been using Excel for a very long time, if I recall correctly version 3.0 on Windows 3.11 for Working group. but as a concept I used to use an older app called lotus123.

In this post i will not explain how Excel Works, or what its interface is about. There is a lot of blogs and details posts about that all over the internet. I will explain some basic concepts of how formulas and equations are used, so as later in another post we can combine that with Revit API.

How does it work

Before we use it, we need to understand some terms (Range, Formula)

Cell: is a location unit in a table, where you can fill it with data (number, text, image...etc)
Range: is a collection of two or more cells.
Formulas and Functions: is an expression which calculates the value of a cell.
Worksheets: a collection of cells where you keep and manipulate the data. Each Excel workbook can contain multiple worksheets.

I am assuming you already installed and running Microsoft Excel.

Write your first Formula:

let's say you have a collection of numbers written in cells, and you want to sum them up. you can simply go to an empty cell and type this formula =SUM(your Range) in the formula textbox.

where images and videos says more than reading a line. see this video


HandShaking with Revit

After we got to know what are the possible access to Revit. Lets Implement one.

Create a HandShaking App.

these are the steps we will take in this post, to write our first Revit app.
  1. Setup a dll library Project.
  2. Reference Revit dlls 
  3. Use Revit library in your Class
  4. Decorate your Class with Transaction [for more information about this step see here]
  5. implement Interface
  6. Write your Code
  7. Create a Manifest File 
  8. Security Concerns
  9. Hand Shake with Revit

Setup a dll library Project

We have already explained in a previous My First C# Program how to setup a project. However, that post was for a Console Application. This time we will choose a dll library Project. follow the same steps in the "My First C# Program" post and instead of Selecting Console Application, select  Class Library Project.

You can Set your Project Name anything you want. We will name it "LAI02_HandShaking"

Reference Revit dlls 

Since we need to write an application that communicate with Revit, we need to feed our program with extra information about Revit. Gladly, Autodesk allowed access to Revit through specific dlls. `RevitAPIUI.dll` and `RevitAPI.dll`. These two files can be found here:
[your Revit Installation Folder\RevitAPI.dll]
example: 

  • D:\Program Files\Autodesk\Revit 2020\RevitAPI.dll
  • D:\Program Files\Autodesk\Revit 2020\RevitAPIUI.dll
to reference these two files to our project follow these steps:

  1. Go to Solution Explorer
  2. right click on Reference
  3. Select: Add Reference
  4. Browse for these 2 library files
  5. select both and click on Add.
  6. then Click OK.

for a quick view see this Video.

Since all necessary dll files already exists under Revit folder, It is preferable to set Local Copy to false, this will avoid copying those dll files to your output folder.

Note: adding a reference to you project doesn't mean we are using them. we have to explicitly tell our program to use or to address them.

Use Revit library in your Class

Add using statements to inform our Project we need these library in our project.
```using Autodesk.Revit.Attributes;
using Autodesk.Revit.DB;
using Autodesk.Revit.UI;
```
you can think of these using statements as if you opened a book in a library and kept it open on a specific chapter, so you can easily pick information from.

Decorate your Class with Transaction

above LAI02_HandShaking Class add this decoration
```[Transaction(TransactionMode.Manual)]```
we gave a little bit explanation about what are these decoration in a previous post. but in short, it is required to allow Revit recognize what is the intention of this class is it going to modify the Document or will only Read its contents.

TransactionMode has 2 values. either `Manual` or `ReadOnly`

Implement Interface

Interface is defined by Tutorials Teacher as:
An interface is like a contract. In the human world, the contract between the two or more humans binds them to act as per the contract. In the same way, the interface includes the declaration of one or more functionalities. Entities that implement the interface must define functionalities declared in the interface. In C#, a class or a struct can implement one or more interfaces.~Tutorials Teacher
 with that said you can think of it a list of a must to do list. and like we previously mentioned, it is a requirement to allow Revit recognize this class for accessing. see our Post IExternalCommand is an Access

now move your mouse pointer in your code editor and right click on IExternalCommand, then select Quick Actions and Refactoring...
then select Implement interface.
you can also click on (Ctrl + Period)

now your class should look like this by now:
```[Transaction(TransactionMode.Manual)]
public class LAI02_HandShaking: IExternalCommand
{
    public Result Execute(ExternalCommandData commandData, ref string message, ElementSet elements)
    {
        throw new System.NotImplementedException();
    }
}```

Write your Code

now we are ready to write our first statement. Remove this line
```throw new System.NotImplementedException();```
and write the below
```TaskDialog.Show("HandShaking", "Welcome Professor");
return Result.Succeeded;```
TaskDialog: is a static class library provided by Autodesk and its purpose is to display messages in a window box. it is explained in RevitAPIDoc as
A task dialog is a dialog box that can be used to display information and receive simple input from the user. It has a common set of controls that are arranged in a standard order to assure consistent look and feel.~RevitAPIDoc
and finally your full class.cs file should look like this:
```using Autodesk.Revit.Attributes;
using Autodesk.Revit.DB;
using Autodesk.Revit.UI;

namespace LAI02_HandShaking
{
    [Transaction(TransactionMode.Manual)]
    public class LAI02_HandShaking: IExternalCommand
    {
        public Result Execute(ExternalCommandData commandData, ref string message, ElementSet elements)
        {
            TaskDialog.Show("HandShaking", "Welcome Professor");
            return Result.Succeeded;
        }
    }
}```

Now build your Project, Right click on your Project Name in the Solution Explorer and select Build

Create a Manifest File

A manifest file is like an administrative works. I will detail more about this file in a separate post, but in brief, Since Revit does know nothing about your dll file. Revit API setup a strategy to identify what dll file it should look at. this File is a text file with extension `.addin `containing
```<?xml version="1.0" encoding="utf-8" standalone="no"?>
<RevitAddIns>
        <AddIn Type="Command">
        <Assembly>D:\Dropbox\API Tutorial\LAI02_HandShaking\LAI02_HandShaking\bin\Debug\LAI02_HandShaking.dll</Assembly>
        <AddInId>239BD853-36E4-461f-9171-C5ACEDA4E111</AddInId>
        <FullClassName>LAI02_HandShaking.LAI02_HandShaking</FullClassName>
        <Text>HandShaking</Text>
        <VendorId>arch4hum</VendorId>
        <VendorDescription>Let's API It</VendorDescription>
        </AddIn>
</RevitAddIns>
```
Now copy the above and start any text editor such as NotePad. and past these in. You need to ensure that line 4 is exactly pointing to your Project Location. then Save this file as LAI02_HandShaking.addin to this locaiton
```C:\ProgramData\Autodesk\Revit\Addins\2020\LAI02_HandShaking.addin```
you need to change 2020 to you related Revit version.
Now Start Revit

Security Concerns

starting from Revit 2017 Autodesk add more control on how additional dll libraries are loaded. in that sense the moment you start Revit and recognize your addin/dll file... it will pop up this message.

Click always load, as long as we are the developer of this addin, aren't we? :)


Hand Shake with Revit

click on addinTab, and click on External Tools button, and select HandShaking


by now, you have completed your first Step to integrate with Revit.

WPF-Revit -01

In this post, we are going to surface explore WPF structure and how to use it within Revit App. Windows Platform Foundation WPF ...